
Methodology. A word that reverberates in my head quite a bit. Its a specific approach and a way to do things properly. Something that requires time and nurturing.
The dictionary sites the origin of the word method as such. ORIGIN
late Middle English (in the sense ‘prescribed medical treatment for a disease’): via Latin from Greek methodos ‘pursuit of knowledge’, from meta-(expressing development) + hodos ‘way’.

Your tools will inform your methods through both time and trial & error. Fortunately we have access to some pretty sophisticated tools!
Over the years I have refined my process of trying to build the best wheels possible. In 1973 it all started with some very simple tools, but they were more than good enough to produce some very impressive wheels if you took your time. Gradually new and better tools came into existence and they were embraced , though this always meant going back to the drawing board with your methods.
It was during that first year of building that i did something rather audacious. I dared to challenge the status quo by questioning conventional lacing patterns that were probably a 100 years old. One day I was stairing at a wheel that I just built and it dawned on me that there just might be a different way of lacing a bicycle wheel that could be superior. I ruminated on that thought and then decided I would pose this question to an engineer that sometimes dropped into the shop. One day he showed up at the bike shop and I sheepishly asked him if there was any merit in my idea, He listened to me and then went silent for what seemed like a an hour and then looked up at me and said, “well, your new lacing pattern would eliminate the stress riser on half of the spokes and thats a good thing” . Why don’t you build some wheels and see what happens”
That was enough for me to give it a whirl. I started building all my wheels with this symmetrical pattern instead of the conventional asymmetric pattern that virtually everyone else used no matter what country they were built in. My pattern had all the pulling spokes going in the same direction instead of opposite directions like all other wheels. All my pulling spokes left the flange cleanly without touching it and this eliminated the stress riser common to other lacing patterns.
This was probably the first time that I realised I was becoming very aware of methodology. Methodology mattered. This was no small thing. I was challenging every wheel builder in the world. Essentially telling them there was a better way.
Well, 47 years later and I still lace all my wheels in this fashion. Many other wheel builders around the world have adopted this lacing pattern and I am sure many have ignored it. Is it better? I’d say so.
This blog entry would be far too long if I went into all the reasons why I feel this is superior so I’ll leave that for another day, but suffice to say I realised the value of challenging traditional methods and thinking outside of the box.
I noticed that Enve now builds all their wheels with this lacing pattern. Its been acknowledged by some who have written books on the topic but I have never seen my name credited for this innovation. It matters little to me because I know who got there first.
I would say that this departure from the norm encouraged me to think independently and to fearlessly question anything I felt could stand some improvement. This was the birth of my very own methodology.
I was in a good situation to experiment because this was the era of the “bicycle boom” and I was being exposed to all sorts of new components and getting constant feedback from serious cyclists. As I have said before “this was the crucible that forged all my methods”.
Its amazing how much you can learn on virtually any topic if you dive deep enough down the rabbit hole and resist getting either jaded or cocky. As an old friend who worked at NASA once said, “The mind is like a parachute, it doesn’t work very well when it isn’t open”
It would be impossible to relate every last story and every change I have made along the way but I can say its been a constant evolution. Much of it driven by an increased knowledge of the material science required to understand why things work or fail. Its helped me immeasurably to learn about various metals and their intrinsic properties and now about carbon fibre and how that informs modern rim design and many other materials as well. Admittedly its not everyones cup of tea to fill your night time reading with the behaviour of 6061-T6 alloy under certain stresses or the importance of specific carbon lay up to achieve superior bicycle rims. But taking the time to understand these things has proved invaluable.
Its all helped to shape the way I build wheels. Remember, my goal wasn’t just to be a pro wheel builder. My goal was to be the best wheel builder in the world. That requires a lot of work and a unique approach.
Along the way I ran into a very interesting and relevant question about spoke tension. Should I continue to rely on my highly developed “feel” approach to correct spoke tension that I had trusted implicitly for decades? It had never once let me down and I prided myself on having acquired such reliable sensitivity to a wheels final tension.
But new tools were starting to emerge that supposedly measured this tension for you and gave you some sort of idea of a final tension in KGF. Kilograms of force for the uninitiated.
At first I balked at this notion that one needed such information and wondered if I should start relying on this tool to dictate my spoke tension. I kept asking myself if my “feel” had ever let me down and the answer was NO it had not. So for a long time I never bothered giving it much thought and kept building with my time honored methods.
Then I came across a situation where real hard numbers would have settled an argument about whether I had built a wheel to someone else’s notion of an ideal finished tension. I then realised that I didn’t have any quantifiable measurements that I could provide to convince someone of my expertise.
At that moment I started to see the benefit of recording these measurements to have some sort of record I could look at months or even years later to confirm that I had used an identical approach with a specific rim and hub combination. I could also talk numbers with others in the industry and we’d all have something that we could agree upon as a reliable guide.
I was quickly becoming a convert to the “spoke tension meter”. A new rabbit hole presented itself. I dove down to the bottom to see what I would find.
Being a complete tool junkie, it wasn’t long before I bought myself a good quality spoke tension meter. It was The DT Swiss Tensio 2. An analogue meter that was used by quite a lot of wheel builders who had embraced this before myself.
I quickly determined that this tool had its strengths and its weaknesses. This led to the search for a meter that didn’t have any limitations.
I was quite fortunate to stumble across a meter for sale that looked like it was made by some spoke tension guru. It seemed to tick all the boxes and I wanted that one! I ordered it and was blown away with the quality of workmanship and accuracy that this meter had. It also eliminated some of the inherent problems in the DT Swiss meter that bothered me.
This began a relationship with Filip Kralyevski, the designer and builder of this high quality tool. Filip is an interesting character who has a brilliant mind for design problems and is also able to actually make the things he dreams up!
Cognoscenti Cycles collaborated with this master CNC man and genuine design guru to produce the worlds best spoke tension meter. Filip’s talents are special. He’s not a pro wheel builder but he’s listens to your input which translates to a superior end product. He’s a perfectionist who goes straight back to the drawing board when its not just perfect. Our collaboration produced an amazing meter that I firmly believe is better than any currently available. Its degree of both sensitivity and accuracy is unparalleled. Its also quite robust with the best parts we could find. That tool helped shape my wheel building methodology in a way that I could have never envisioned prior to its existence. Its added a considerable amount of time to my build because I now take a brand new step that simply didn’t exist before this tool came along. I am happy to increase my build time to attain a new level of accuracy previously unattainable.
As time has marched on I have learned to not get too set in my ways and not to greet change with a degree of suspicion and hesitancy. I love experimenting with new tools to see how they can be incorporated in my work flow. Do they make better wheels? Did it make the chore somewhat easier? Most importantly did it increase accuracy. It always seemed to boil down to that. I am constantly striving to obtain an almost unachievable level of accuracy.
Its that mad desire to chase the ever elusive goddess of perfection. We all intrinsically know this is an unattainable dream but we press on nevertheless.

The Cognoscenti Cycles spoke tension meter. A CNC machined body with a Swiss made Atorn dial indicator. The THK linear roller bearing minimises unwanted friction to almost nothing.
A Blast from the past…
Its always interesting to look back and see what’s changed and what’s the same. For instance, I am still using several tools that I started using in the 70’s. If it ain’t broke don’t fix it! The Campagnolo dishing tool that had its debut in 1952 remains basically unchanged and vintage ones fetch a pretty penny on Ebay regularly. Some claim they have improved on this design but I am not convinced. So I soldier on with my trusty Campy dishing tool that still delivers the goods.

The Campy dishing tool, first scene in the 1952 Campagnolo catalogue. This invaluable tool has stood the test of time.
Some tools have come full circle. Back in the early days I used an ancient Yankee driver to help speed up the lacing task. This tool was older than Methuselah! As the years ticked by I eventually became parted with that tool and somehow I kind of forgot about it. One day I was lacing up a wheel and I recalled that it seemed much easier and quicker when I had a Yankee driver. I searched the web to find one and was disappointed to find out that Stanley no longer made them. I continued my relentless search as any tool junkie would and finally came across a company in Germany who had done a faithful recreation of the old 19th century Yankee driver. So I ordered one up immediately and rejoiced when the mailman finally dropped it off. Its 1973 all over again and life is good!

What’s old is new again! My new German Yankee driver replete with a handful of different bits for different types of nipples. I can drive DT Swiss Torx, old school slot head for vintage builds and 3.2 mm double square nipples for both internal ( Enve) and external nipples.
I am always looking for new tools to make things easier, faster, and more accurate but sometimes a new tool surfaces that didn’t exist before and someone just dreams up a new approach to an old problem. One of those was the new Unior Hub Genie. A clever tool that enables you to remove stubborn hub end caps that should normally just pull off by hand.

The Unior Hub Genie. A new tool to help remove tight end caps. Two different versions enable you to remove all sizes of end caps.
A new edition to my growing assortment of tools is the Roval spoke holder. This handy tool grips the spoke tightly to stop it from twisting or “winding up” as we say. Light weight spokes have a tendency to do exactly that when under higher tension and this can cause problems while building. The Roval tool stops this wind up from occurring while you make adjustments to the nipple. Invaluable!
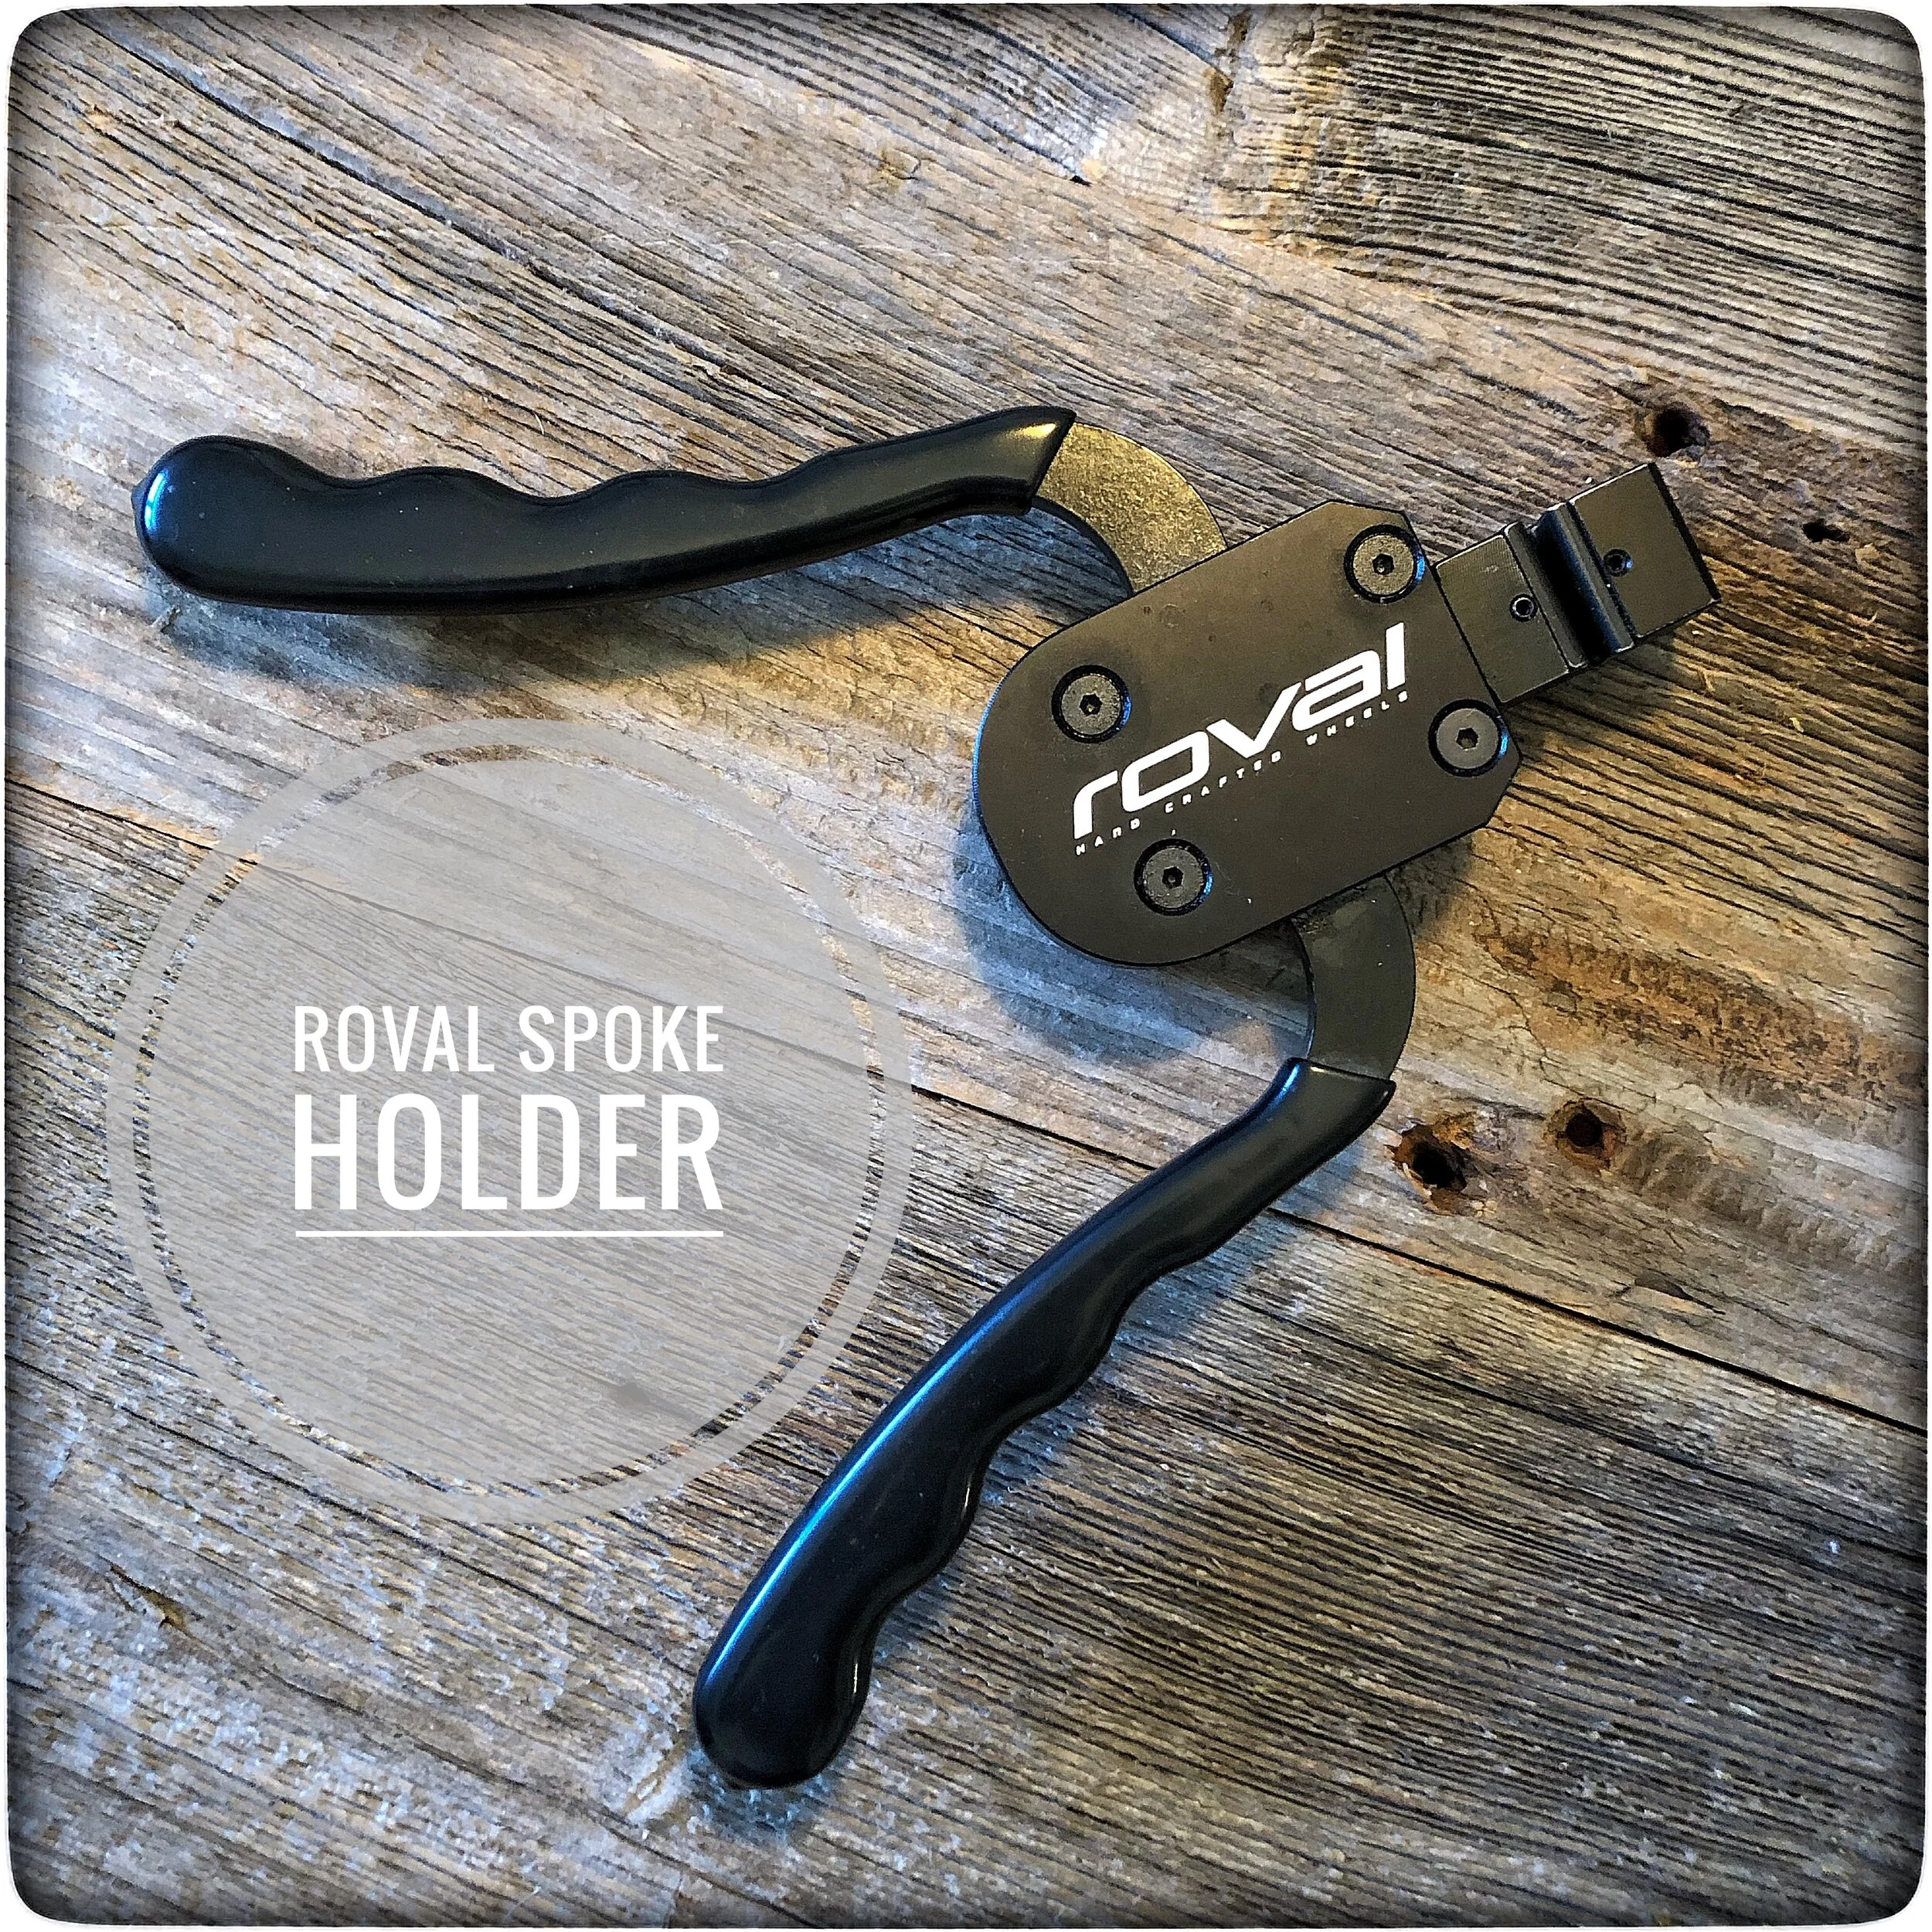
The Roval spoke holder is an indispensable tool for stoping unwanted spoke wind up. Its a bit heavy but saves me a trip to the gym to lift weights!
My Park truing stand is another stalwart tool that I love. A simple heavy chrome plated beast that keeps going no matter how old it is. Mine has no fancy dials or any real upgrades, yet I still build wheels within ridicuously fine tolerances at even tension. Wheels that Egan Bernal or any top racer would be happy to be riding their most important races on. Nuff said.
Are there newer fancier truing stands out there? In a word, yes. If you’ve got the dough you can buy a lovely P&K Lie stand from Germany that’s a work of engineering art. Fancy dials and numerous brass fittings that make this the Rolls Royce of wheel truing stands. There are other high end stands like the one from Aivee in France. Its a gorgeous stand in a Ferrari red colour that rivals the P&K Lie for most stunning stand on the planet. Lastly is a creation from the UK that also is a beautiful work of CNC art. Bicycle Manufacturing has been making their model for a few years now and it also boasts super fine tolerances and just looks amazing.
DT Swiss has a truing stand that is their attempt at refining the wheel builder experience. Personally I wasn’t enamoured with how that stand functioned in real life. I bought one, hoping for an improved building experience and it left me cold. After only using it on one pair of wheels I quickly realised it was not my cup of tea. It was promptly boxed back up and sent back to Bike 24 for a full refund.
Will I buy another wheel truing stand? Probably…. When you are constantly refining your methodology you loose sleep over how to get to the next level and this usually involves experimenting with new tools.
Not all are perfect fits and you realise that something may work for another builder but its feng shui is definitely not for you!
This is why there are so many different approaches to wheel building. One guy/gal relies on truing by ear and another guy does something completely different and somehow both people build great wheels.
There are numerous other comparisons that could be highlighted but you get the point. And we all have our secrets. The black art of wheel building is shrouded in many secrets. We have more secrets than the Freemasons! So, I am guilty as charged! I have numerous techniques that I can honestly say I have never revealed to any other wheel builders. Even when I give wheel building seminars I am careful to leave out all of my special techniques! They are trade secrets, some new and some old, and they may follow me to the grave!
Made in Switzerland you say…
I recently bought a tool that came from a wheel builder in Switzerland. Blackcat Wheels has an excellent load cell custom made in cooperation with Tomasz from Fetish Bike.
This fantastic tool enables us to calibrate our new spoke tension meters to an incredible level of accuracy. It also enables us to evaluate new spoke models that require tension charts for our meters. This is a huge step forward in guaranteeing ideal overall spoke tension in every wheel we build. Chasing perfection like never before!

A collaboration between Fetish Bike and Blackcat Wheels in Switzerland. A beautifully made tool that facilitates the calibration of spoke tension meters to a super fine tolerance. The purple meter on the right is the Cognoscenti Cycles meter.
These sophisticated tools are usually not seen in large wheel building factories. They require seasoned expertise and extra time to build in this manner to produce the finest wheels in the world. But this is what differentiates us from wheel building factories. Small boutique wheel building companies build in a VERY different way in comparison to their wheel factory competition. Make no mistake, there is absolutely no comparison!
In this world of fine tools and know how, I have to give a shout out to Ric Hertjberg. He’s the owner and brains behind Wheel Fanatyk. This company sells wonderful tools to both budding and seasoned professional wheel builders, Ric has been at this wheel building game for almost as long as I have and has tons of experience at all levels of building. Who would know better what tools you’d need to build great wheels than him. Check out his website when you are hunting down the right tools to lead you to wheel mastery.
Ric has given us such gems as the Morizumi spoke cutting and threading tool. I bought one of these last year and its quite an impressive tool on several levels. Originally designed and built in Japan by Morizumi Masakazu who once worked for the Asahi Spoke Company. This super robust tool does a perfect job of allowing you to cut spokes within a half millimetre and with perfect threads rolled each and every time. There really is nothing that quite compares. It is now made in the USA with a few small improvements from its original design. Ric oversees its manufacture and tests each one before it goes out the door. If you custom cut spokes, then just buy one. Yes, they are hardly cheap, but it will make spoke cutting a joy. You won’t regret it.

The Morizumi spoke cutting and threading tool. A must have tool in a pro wheel builders arsenal. Available from Wheel Fanatyk. Thanks Ric!
Over the years all these new tools have given birth to subtle refinements of the entire wheel building process. Nobl’s wheel lacing jig is a new tool that makes a three handed job into an easy two handed job. It also doubles as the perfect tool to apply new rim decals. Kudos to Johnny!
I have to mention two little tools that I wish existed 40 years ago. The Mulfinger from EVT and the nipple shuffler from Wheel Fanatyk. Those humble tools make lacing a wheel so much faster and easier.

Efficient Velo Tools handy Mulfinger nipple tool. It comes in two lengths and certainly helps to speed up the lacing process! Paired with the Wheel Fanatyk nipple shuffler and you just made wheel building that much easier.
I would be remiss if I failed to mention how many different bladed spoke holders exist. All of them do the same job but they all are slightly different in how they fit in your hand and how much of the spoke they grab.
Over time i have found the best time to use each one of them. Some I use at earlier stages of the build when the spokes are not under great tension and then I transition to a different one when tension becomes increased.
DT Swiss has two ingenious models that dovetail nicely with their spoke key. For rims with internal nipples the longer plastic models by Icetoolz and Birzman work wonderfully.

Some of the bladed spoke holders tools that i use regularly. Lots of different shapes and sizes to work with!
With new spoke nipples the need for the right tools to turn them has arisen. The photo below will give you an idea of just how many tools I own to just turn spoke nipples. There are different interfaces, like 3.2 mm square heads, 5.5mm hex heads and DT Swiss’s Torx nipples to name just some of the sizes that exist.

These are just some of the many tools required to turn spoke nipples. Will there be more in the future? Undoubtedly!
As you can well imagine all these tools will lead to a multiplicity of different approaches for their use. Every pro wheel builder will eventually decide how he thinks a wheel should be built and finished. Probably no two methods will be identical.
This is not just in the world of wheel building. Every artisan making anything will come to his own conclusions on what the best methods are. In the end the proof will be in the pudding as the say!
There are some new amazing custom tools on the horizon for Cognoscenti Cycles that will help to once again refine the process. What are they? That would be telling! Got to keep those secrets secrets.

P & K Lies 3.25 spoke key. Its four sided and fits ultra snug which is great for use on anodised nipples, reducing the likelihood of leaving marks on a new nipple.